Official Luthiers Forum!
http://www-.luthiersforum.com/forum/

New Website/Adjustable Neck Joint
http://www-.luthiersforum.com/forum/viewtopic.php?f=10102&t=6518
Page 1 of 1

Author:  Dave White [ Fri May 05, 2006 7:43 am ]
Post subject: 

After a frustrating year or so of not being able to update my website properly, I have my new site up and running. I'd be interested to get any feedback from you OLF'ers on how you think it looks/operates.

I have some sound samples of my guitars there (which some of you have already found by other routes 
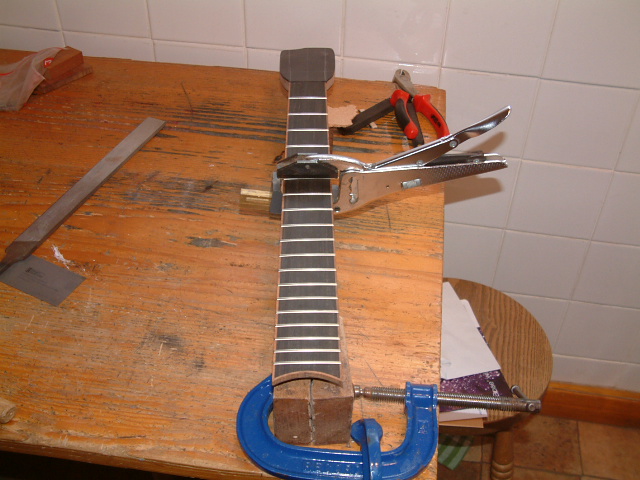
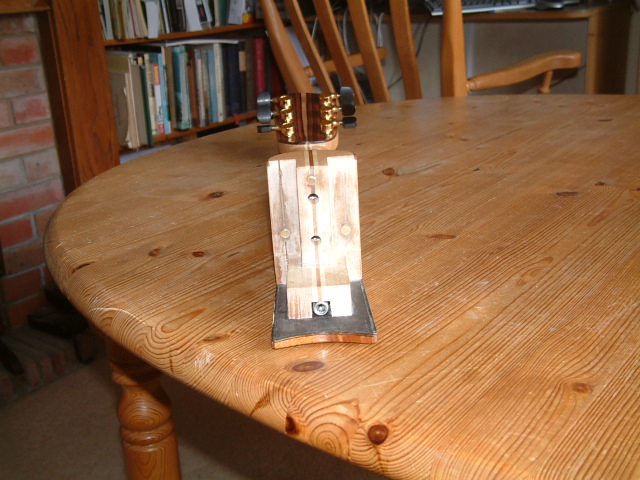
) and have a section for Luthier Interest. I have put on there my adaptation of the wonderful Fleischman-Williams binding jig and also details of the adjustable neck joint I am trialling on my instruments at the moment which is an adaptation of Mike Doolin's brilliant design. The detailed process is documented on the website but here's a few of pictures of the neck of my recent cedar/maple guitar Samhain:

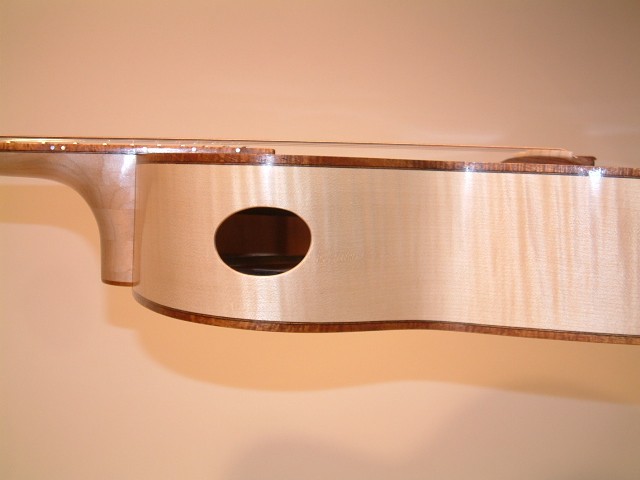
The top 2 set screws are pivot points and allow some fine tuning of neck alignment and intonation distance, whilst the bottom set screw adjusts the neck angle and hence string height:


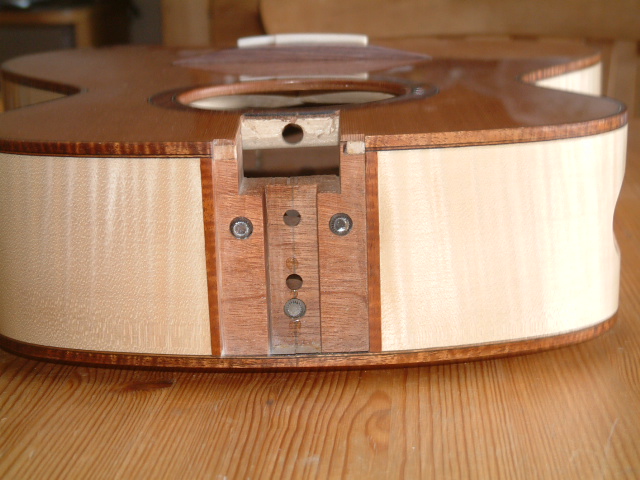
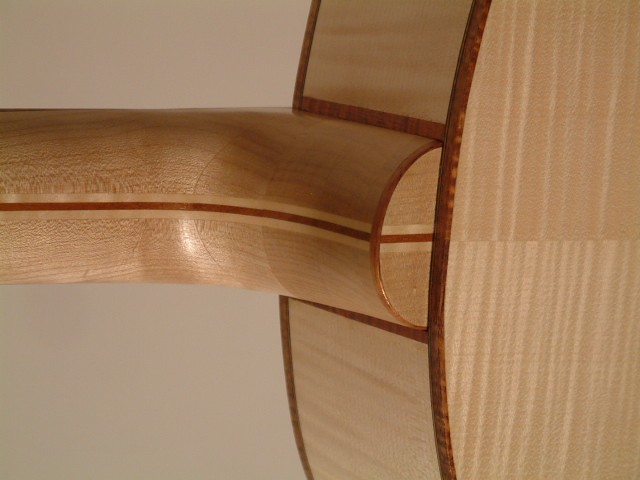
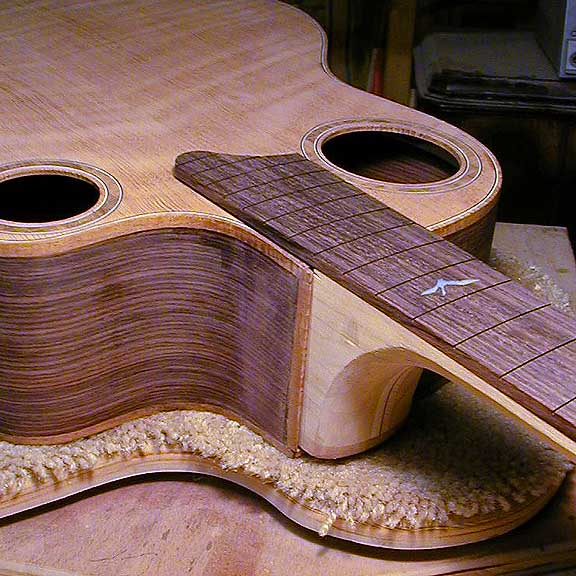
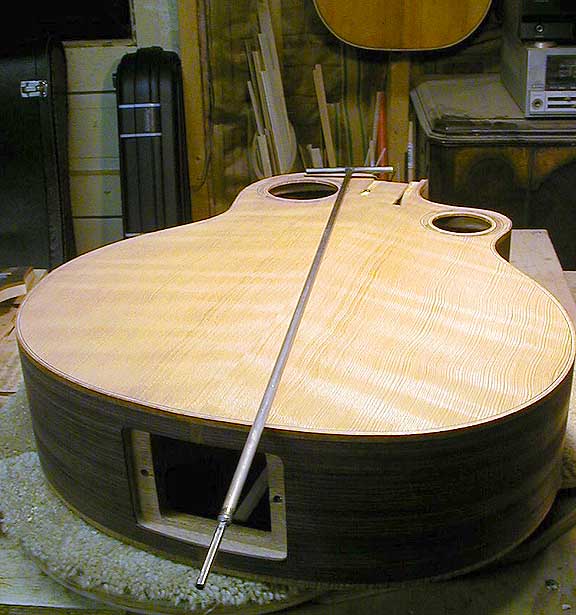
The fingerboard is supported by a solid neck that goes all the way up to the upper bout transverse brace (18th fret). The neck has a stacked heel built up on this. The neck attatches by 2 bolts as normal and floats freely on the body top, and sits in a pocket routed in the front face of the neckblock:


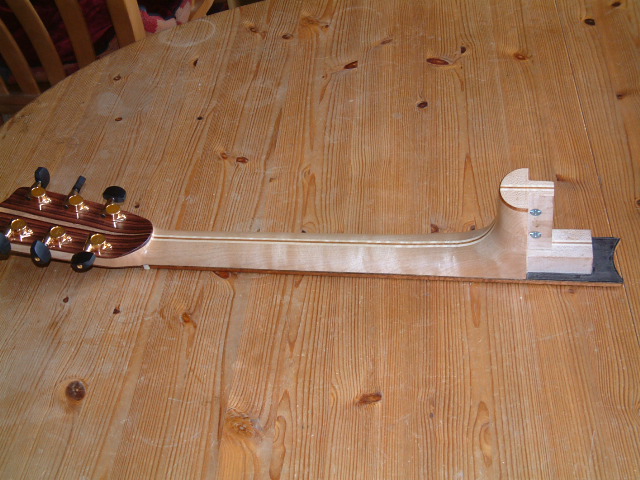
There are brass inserts where the 3 set screws abut the neck heel area:


Mike Doolin's design uses only the top 2 set screws and uses the bottom bolt tensioned with spring washers for the bottom pivot. While this is more elegant, I found it hard to assemble/dissemble the neck easily and came up with my adaptation. The adjustable neck joint has a lot of similarities with the one posted recently by Grant Goltz.

Author:  burbank [ Fri May 05, 2006 8:13 am ]
Post subject: 

Hey, Dave,

Did you know there's a big dent on your upper bout?


Seriously, I really like the design of your site. Lots of white space, simple, not a lot of bells and whistles, to the point, and most important, easy to navigate and easy on the eyes. One piece of constructive criticism, though. The image of that nice guitar on the top of all the pages gets a bit repetitive after looking at a half dozen pages. Perhaps that real estate could be put to another use, another image, or info. A very minor point, though. Very attractive site, it conveys a mature image of yerself and your work.

Really excellent neck joint! How about a pic of the joint with the guitar assembled?burbank38842.7186689815

Author:  Dave White [ Fri May 05, 2006 8:16 am ]
Post subject: 

Pat,

Thanks for this. That image is not one that I can "edit" it is part of the template/layout and so remains constant on each page. At least I think so - I'll check it out with the web people.

That "dent" is part of my lighter upper bout bracing regime

Author:  Mark Swanson [ Fri May 05, 2006 8:55 am ]
Post subject: 

Dave, I like your adaption of Mike Doolin's neck joint, but I am confused by what you said about Mike using "only the set screws and lower bolt". That isn't the way he does it, or else I am confused. He uses two bolts, just like you do.
I also use this neck joint. I use two bolts, and the spring washers to compress both of the bolts inside the neck block. There is a spring washer both under the bolt head, AND on top, and the washers and bolt heads are compressed between two layers of wood on the front side of the neck block. Of course you have to drill holes so you can adjust the bolts!
For me, I think you have too large of a piece of wood cut out of the top of the neck block for the fingerboard support. Mike uses a piece of CF there under the fingerboard. I stole an idea from Harry Flieshman and use two Cf tubes, running the length of the neck. I install these by routing half of the depth in the neck, and half in the fingerboard so that the tubes are sandwiched between. Then all I have to do is route two channels in the top, under the fingerboard for the tubes. This allows me to place the top bolt and the pivot point higher up towards the top than you did here, about an inch it looks like. I am not sure if there's a big advantage in having the bolts further apart, but it makes sense to me. Mark Swanson38842.7501851852

Author:  Serge Poirier [ Fri May 05, 2006 9:32 am ]
Post subject: 

Great website Dave, no surprise i love the music and that neck joint also!

Serge

Author:  Dave Anderson [ Fri May 05, 2006 10:03 am ]
Post subject: 

I like your site Dave .Its very easy to use and I really like your adaptation of the Fleischman-Williams binding jig.Very cool having that extra lazy sue in there

Author:  Sprockett [ Fri May 05, 2006 11:25 am ]
Post subject: 

The site looks good Dave, nice, clean and quick...

On the neck joint, where does the heel sit? inside the mortise or on top of it?

Just curious, I've been thinking of making some small mods to mine to do something similar but would like to keep a tight clean line along the body and heel...

Cheers

-Paul-

Author:  Mark Swanson [ Fri May 05, 2006 2:20 pm ]
Post subject: 

Paul, I am quite sure that Dave does that part the same way I do....the neck heel sits inside a pocket, so that you can't see the edges of the heel. It's inset in a small amount, enough to cover the gaps.

Author:  Billy T [ Fri May 05, 2006 3:46 pm ]
Post subject: 

I like your site Dave. The Guizoukis are pretty cool too!

Author:  Dave White [ Fri May 05, 2006 6:43 pm ]
Post subject: 

[QUOTE=Mark Swanson] Dave, I like your adaption of Mike Doolin's neck joint, but I am confused by what you said about Mike using "only the set screws and lower bolt". That isn't the way he does it, or else I am confused. He uses two bolts, just like you do.
I also use this neck joint. I use two bolts, and the spring washers to compress both of the bolts inside the neck block. There is a spring washer both under the bolt head, AND on top, and the washers and bolt heads are compressed between two layers of wood on the front side of the neck block. Of course you have to drill holes so you can adjust the bolts!
For me, I think you have too large of a piece of wood cut out of the top of the neck block for the fingerboard support. Mike uses a piece of CF there under the fingerboard. I stole an idea from Harry Flieshman and use two Cf tubes, running the length of the neck. I install these by routing half of the depth in the neck, and half in the fingerboard so that the tubes are sandwiched between. Then all I have to do is route two channels in the top, under the fingerboard for the tubes. This allows me to place the top bolt and the pivot point higher up towards the top than you did here, about an inch it looks like. I am not sure if there's a big advantage in having the bolts further apart, but it makes sense to me. [/QUOTE]

Mark,

Thanks for the feedback.

Maybe it's just the way I'm expressing it but I think we are on the same page. I meant that Mike only uses 2 set screws (in line with the upper bolt) and his adjusting pivot uses the lower bolt that is there anyway. As you say he uses a washer on either side of the lower bolt head - with the outside one a spring washer - and then glues the outside piece of the neckblock against the bolt with a hole drilled through for adjustment. This is a very elegant way as the lower bolt is held firm and the neck moves when you adjust the screw, and you can adjust the neck with the strings under tension (although getting your hand in there to dothe adjustment is another matter). What I didn't like was getting the neck on and off the guitar with this arrangement and so came up with my "inelegant" solution.

I'm not sure what you mean about too much wood being cut out of the top of the neckblock. I've seen the CF method Mike and others use to stiffen the fb extension, but I like the idea better of the neck shaft continuing and supporting a greater area of the fb extension. Weightwise I don't think there is an issue - there is almost a direct trade between the wood being in the neckblock or on the neck. Structurally I don't think there is an issue as the cf buttress braces are dealing with all this. Having the top bolt further up towards the neck means the pivot point is higher and less turning is needed on the bottom screw for the neck angle change, but it is very sensitive in my arrangement with a quarter turn of the lower bolt being the max I have needed so far. The neck attachment is stable as well with the bolts where they are. As I say I'm evaluating how it performs.

I'd love to see some pics of your neck joint.

Author:  Dave White [ Fri May 05, 2006 7:13 pm ]
Post subject: 

[QUOTE=Sprockett] The site looks good Dave, nice, clean and quick...

On the neck joint, where does the heel sit? inside the mortise or on top of it?

Just curious, I've been thinking of making some small mods to mine to do something similar but would like to keep a tight clean line along the body and heel...

Cheers

-Paul-[/QUOTE]

Paul,

Mark is correct, it sits inside the pocket to allow movement like this:


You are never going to get it as "perfect" as a neck heel sitting flush on the sides but you can get it pretty darn close.


Pat - hope that is the picture you were asking for.Dave White38843.1770138889

Author:  Colin S [ Fri May 05, 2006 8:06 pm ]
Post subject: 

Dave, I like the website, I wish more were like this, elegant and not full of gimmicks, great site, been bookmarked. I'll have to go over it with a fine tooth comb for typos though, Your just getting too good at all this stuff! I do miss "Man and his Shed" though!

I'm definitely going to steal your F/W jig modification for my DeWalt.

Colin


Author:  RussellR [ Fri May 05, 2006 8:21 pm ]
Post subject: 

Dave

Great New Site

I Really like it, nice and clear with bags of information, and thank you for the link from your links page I really appreciate that, I will get one added for you from my links.

Your really got that neck joint nailed Dave, Are you gluing in the frets over the body ?

Love the music and I'm looking forward to your new Album.


Author:  Rossy [ Fri May 05, 2006 9:44 pm ]
Post subject: 

Dave,

Great site and music. You make awesome guitars.

blessings,

Ross

Author:  Dave White [ Fri May 05, 2006 11:18 pm ]
Post subject: 

[QUOTE=RussellR] Dave


Your really got that neck joint nailed Dave, Are you gluing in the frets over the body ?

Love the music and I'm looking forward to your new Album.

[/QUOTE]

Russ,

No - all of my frets are pressed in using the Stew Mac tool (Jaws1). I can get up to the 12th fret using the tool, after that I have a spare of the cauls that come with it that I place over the frets and then tap them down. The neck extension gives great support fior this and I have made a jig to support th back part of the heel:


I made a CD 4 years ago and the new one has been in "preparation" ever since - all of this guitar making malarkey seems to get in the way

Colin,

Thanks - there will be lots of typos, don't worry. I will bring back Men In Sheds I think. Mind you having read your posts with your microwave, fridge and hostess trolley in your Shed, I have some catching up to do!

Serge, DaveAndy, BillyT and Rossy - thanks

Author:  Mark Swanson [ Sat May 06, 2006 12:28 am ]
Post subject: 

Dave, I see what you mean now. You mean that you don't use a third set screw at the base of the heel, I think. Your work looks very good and I think you have a nice adaption of the neck joint! I'll get a few pics of one I have in the works right now, too. And I'll have a look at your website too!

Author:  RussellR [ Sat May 06, 2006 12:30 am ]
Post subject: 

Thanks Dave

Author:  Dave White [ Sat May 06, 2006 1:44 am ]
Post subject: 

[QUOTE=Mark Swanson] Dave, I see what you mean now. You mean that you don't use a third set screw at the base of the heel, I think. Your work looks very good and I think you have a nice adaption of the neck joint! I'll get a few pics of one I have in the works right now, too. And I'll have a look at your website too! [/QUOTE]

Mark,

Not quite. I use three set screws and 2 neck bolts. The bottom set screw adjusts the neck angle and is below the bottom neck bolt. Mike D uses (or used whenI printed out his detailed instructions) 2 set screws and and 2 neck bolts - the bottom neck bolt being adapted to make it an adjuster for the neck angle.

Looking forward to seeing your pictures.

Author:  Mark Swanson [ Sat May 06, 2006 12:12 pm ]
Post subject: 

Alrighty, back with some pics...here's one that I am working on right now. This is a shot before I glued up the fingerboard, you can see the Cf tubes lying in their slots. I like to use a peghead adjustment for the trussrod, so it stays out of the way of this neck joint.

Mark Swanson38843.8847453704

Author:  Mark Swanson [ Sat May 06, 2006 12:18 pm ]
Post subject: 

Here's a shot of the body with the neck removed, so you can see how I did that...It's much like Mike Doolin's neck block.

Author:  Mark Swanson [ Sat May 06, 2006 12:23 pm ]
Post subject: 

Here's the fingerboard sitting in place. There are slots for the CF tubes in the fingerboard, too. They have the added benefit of making it easier to glue up, because the tubes lock the fingerboard in place and it won't swim around.

Author:  Mark Swanson [ Sat May 06, 2006 12:28 pm ]
Post subject: 

Here's a suggestion for you, Dave- you mentioned that you had a hard time reaching inside to bolt the neck on and off. Well, as you can see this guitar I am building has two smaller soundholes and I can't get inside it at all! So I use an access panel in the end.
I made a long T-handled allen wrench by welding a regular allen wrench onto a piece of steel, and made a T-handle. I made the shaft of the tool thin enough to reach through a regular endpin hole, so it'll work with even a standard endpin. Make yourself one of these Dave and it'll be a lot easier to get that neck on and off!


Page 1 of 1 All times are UTC - 5 hours
Powered by phpBB® Forum Software © phpBB Group
http://www.phpbb.com/